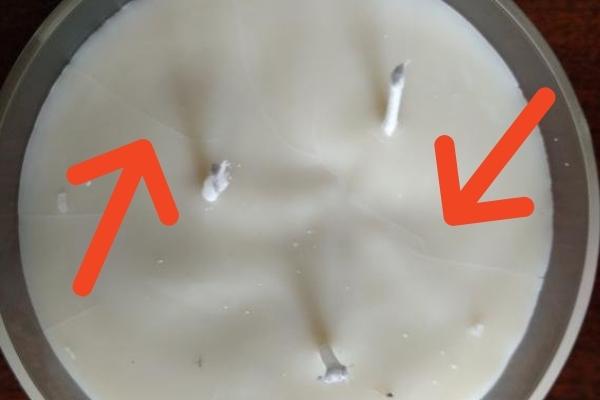
In candle making, a simple mistake can leave an ugly result. This is because there are many variables in candle making. Although soy wax is popular for its sustainable and comforting glow, if you don’t make them correctly, the soy wax can crack. If this has happened to you before, read on for the causes and solutions.
So why are your soy wax candles cracking?
Soy wax candles crack when you pour the wax at a low temperature. Because of this, tiny air bubbles become stuck at the bottom of the container. This then creates cracks and various other surface issues. Apart from pouring at a low temperature, soy wax candle cracks may occur if the candle cools on a solid surface. The solid surface will cool the heat beneath the container too quickly, and the temperature will drop relatively quickly at the bottom of the container.

Candlemakers must pay attention to the fragrance, container, dye, temperature, etc. However, temperature is one of the most vital variables in candle making.
The temperature you pour the candle and the room temperature in which the candle will set and harden is crucial. As a result, candle making in colder months is different from warmer months since the temperature is different. But apart from temperature, there are also several reasons why your soy wax candle may crack.
Common causes of cracking soy wax candles
Here are some of the most common reasons that I have noticed for soy wax candle cracking in my time making them.
Your candle cooled too fast
As explained, accelerating the cooling time for a faster result is not the best approach to candle making. When your candle cools too fast, it will crack on the surface. Some people suggest you put your candles in the freezer to reduce cooling time. However, this practice may cause cracks.
Another issue with candles cooling too fast is candle wet spots which is another nightmare for candle makers!
Pouring at the wrong temperature
When you pour your candle a little bit too cold or hot, you will likely end up with cracks on the surface. This is why candlemakers use thermometers.
Stirring too much or vigorously
How you stir the wax also affects the final result. Remember that cracks occur when air bubbles are trapped at the bottom. When you stir too fast, you will create air bubbles that will travel to the bottom of the container. When the candle cools, the bubbles will convert into small holes that can cause the candle to crack.
Uneven cooling
Uneven cooling can also cause candle cracks. For example, when you place your candles too close to each other, they will retain their heat on the adjacent sides. As a result, one side will cool slower than the rest of the container.
Hasty pouring
Like stirring too fast, pouring your candle wax too fast will trap air bubbles in the wax. This will also prevent even cooling.
Water
Strangely enough, water can cause your candle to crack. If you live in a humid environment, moisture will mix with your candle during the melting or mixing process. This will affect the wax and create cracks.
Water and wax really do not mix and you can find that your wax actually spits and pops if water mixes with it.
Refilling the well after the wax hardens
Apart from temperature, you also time your improvements. If you fill the well in a candle after the wax is completely hardened or cooled off too much, you will end up with a crack.
Incorrect amount of fragrance oil
Using the wrong amount of fragrance oil in your candles can cause all sorts of nasty effects such as cracking. To make sure that you get your wax and fragrance oil ratios right have a try of my free online fragrance calculator.
How to stop soy wax candles from cracking?
Now that we know the main causes for your soy wax candles cracking I am going to give you some awesome ways that will stop it from ever happening again.
Let your candle cool at room temperature
The obvious solution is to let your candle cool at room temperature. Don’t put your candle in the freezer to cool, as the cold will make the candle brittle. When it does, it will crack.
Stir your wax evenly
Stir evenly without applying too much pressure. Stir at the same speed and at the right temperature to avoid air bubbles.
Space your candles during cooling
Put a distance of about 3-inches between each jar or container. This practice ensures that they cool from the bottom up. Also, don’t cool on a flat surface to prevent heat retention. Instead, elevate your candles on a cooling or wire rack to cool. You can also increase the airflow beneath your candles.
Don’t pour your candle too fast
Pour your candle wax slowly. You can use a pouring pot for convenience. Pour at slightly hotter than 50 degrees temperature and heat your containers to 100 degrees before pouring.
Use humidifier
Use a humidifier if you live in a humid environment to keep moisture in the air from affecting your wax.
Gently tap the container
Gently tap the container on the work surface to release trapped air bubbles. But do it gently to avoid creating new problems for yourself.
Let your candle cool on an elevated surface
Elevate your candles on a wire cooling rack while they cool. This will prevent pooling heat from the bottom of the candle. It will also increase airflow and won’t let the candle cool too quickly.
Pour more hot wax
Remelt your leftover wax back to pouring temperature. Slowly pour it over the top of the candle with enough layers to fill the holes. Then, use a skewer to poke the sinkhole a few times to release trapped air bubbles.
Use a heat gun
If there is no leftover wax, use a heat gun to melt the surface. This will fill the hole, and you can poke the holes with a skewer to release the trapped air. However, you may need one or two tries to get it right.
Coat your container
Use a small amount of natural oil like coconut oil to coat your container. This can prevent the wax from getting stuck on the sides.
Conclusion
Making your candle is fun, but it comes with its challenges. Nonetheless, most candle mistakes won’t affect how your candle burns. For example, a crack won’t affect the burn. But for the sake of aesthetics, it is worth getting right. Regardless, mistakes happen.
If you end up with a crack, use any corrective methods above and make your candle as good as new. Or, you can prevent the problem before it happens by paying attention to how you mix and process the candle. Now that you know what causes candle cracks, you can prevent it from happening next time.
- Can You Put Perfume In A Humidifier? (Read First) - September 17, 2022
- Can You Put Essential Oil In A Steam Mop? (Safety Advice) - September 17, 2022
- How To Make Lavender Oil At Home ( Candles And Diffusers) - September 9, 2022
